Summary
- Incident commanders can now create patient channels within an incident by uploading a roster using a .csv file
- You can easily match the columns in your file to Pulsara data fields (e.g., First Name, Last Name, Condition, Chief Complaint, etc.)
- Roster Upload is available only in Pulsara Web
- Only the entity that owns the incident can upload a roster.
- NOTE: This upload functionality is not intended for uploading of non-patient rosters for the following reasons:
- No HIPAA/BAA Coverage: Healthy participant data isn't protected by HIPAA, exposing your organization to strict, separate consumer privacy laws.
- Lack of Explicit Consent: Standard event waivers may not cover clinical data storage, which legally requires explicit, affirmative individual opt-in.
- Data Minimization Violations: Preemptively storing data "just in case" someone gets hurt directly violates modern privacy frameworks like CCPA and GDPR.
- "Right to Be Forgotten" Burden: Because these individuals aren't actual patients, their consumer requests need to be manually processed to edit or delete their data upon request.
- Conflicting Retention Timelines: Consumer data may expire on different schedules than medical records, creating complex compliance and data-purging workflows.
Getting Started
To upload a patient roster to an incident, the user must belong to the organization responsible for managing the incident in Pulsara. Currently, patient data can only be imported into an Incident.
The system requires patient data to be exported in a valid CSV format (.csv or .tsv file extension) and to have the CSV file on a drive accessible on the device that will be used to import. If a patient roster was exported as a different file type, such as a Microsoft Excel spreadsheet (.xlsx), it would need to be exported as CSV before uploading to Pulsara.
Note: changing a file from the .xlsx extension to .csv will not work. The file needs to be opened in Excel and then exported as CSV, which modifies both the data in the file and the file name.
The Roster Import wizard will provide guidance on importing those patients into Pulsara.
What Data Can be Imported?
When importing from CSV, columns in the file can be mapped to the following properties on the Pulsara patient channel
Demographics
- First and Last name
- Date of Birth
- Age (can be auto-calculated from Date of Birth)
- Gender
- Height
- Weight
Triage
- Patient type (e.g., GENERAL or TRAUMA)
- Patient Condition
- Configurable ID
- Using ID types configured on the incident or for the organization
- Chief Complaint
- Narrative Notes
- Text from one or more cells per row can be imported into this field
- Text from one or more cells per row can be imported into this field
Using the Import Wizard
To begin importing, log in to Pulsara Web, navigate to the Incidents screen, click the "View" button for the desired Parent incident or Mission, and then in the Patients Tab, click the "Upload Roster" button.

1. Choose a File
Click inside the input box to select the file to import. Note that only files with .csv or .tsv extensions will be visible in the file picker.

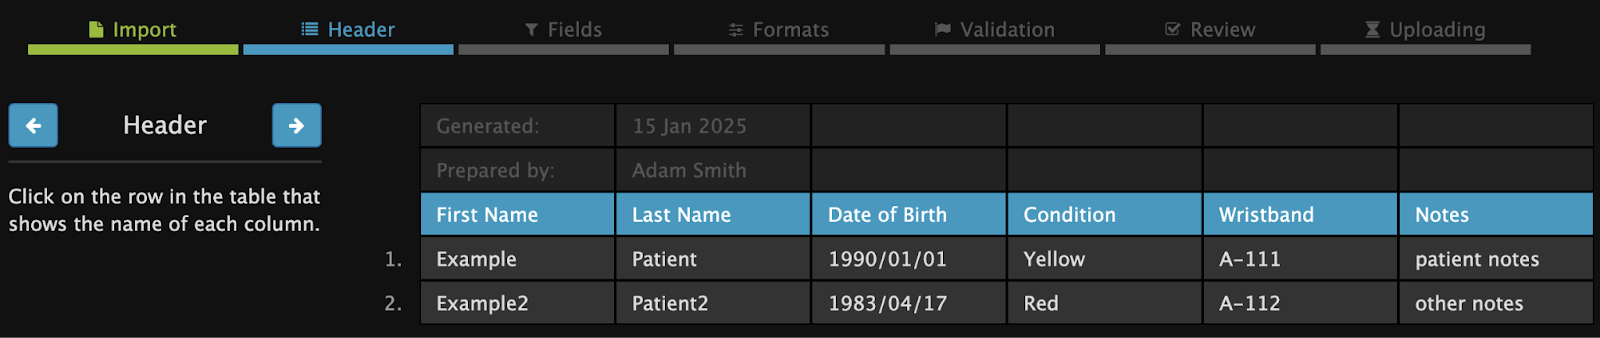
2. Find the Header Row
To associate data in the CSV file with Pulsara patient channel properties, each column in the file must be associated with a particular property. To do this, the header row in the CSV, which names each column, must first be identified.
After selecting a file, a preview of the CSV file will be shown in a grid. The import wizard will attempt to locate an appropriate header automatically, but the selection can be overridden by clicking on a different row.
The selected header row is shown in blue. Note that grayed-out rows above the selected header in the file are ignored and will not appear in subsequent steps.
3. Associate Each CSV Column to a Patient Property
After identifying the header, the Import Wizard will attempt to associate each column in the file to a patient property, using the header value to automatically select a property, where possible.
For example, if the CSV header defines a column as "First Name", the wizard will automatically suggest importing data in that column as the patient's first name.
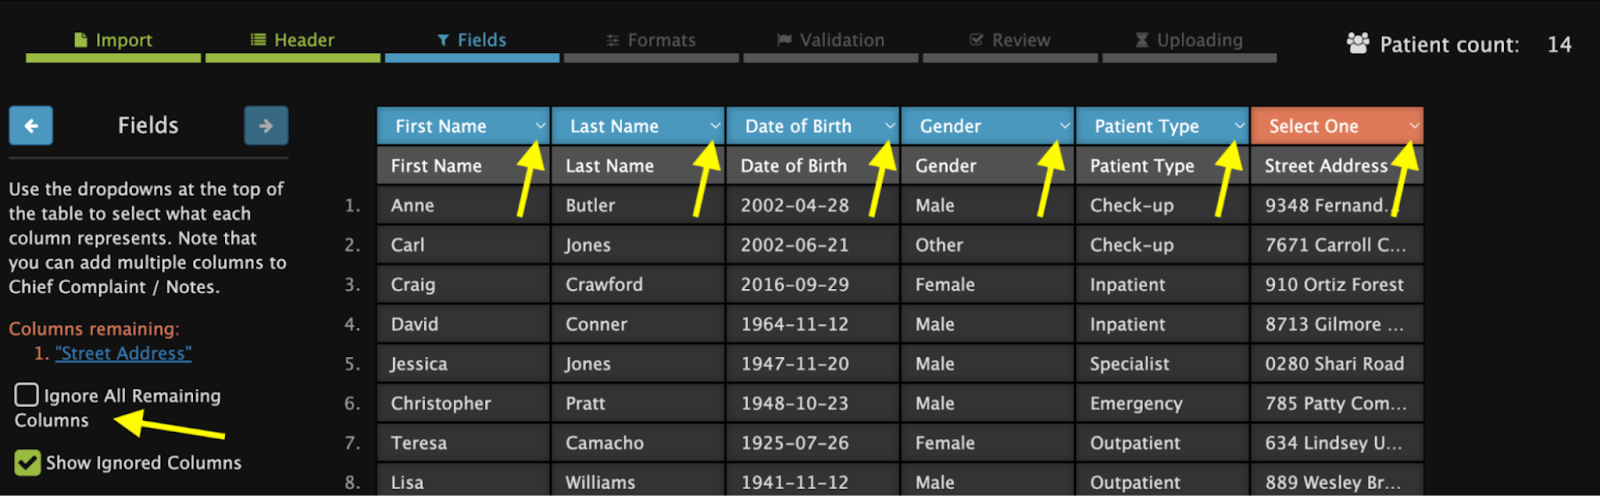
Columns that have been associated with a property are displayed in blue. Columns requiring a selection are shown in orange. Click on any header to choose which property to use or ignore a column entirely.
Note: most properties can only be associated with a single column, but multiple columns in the CSV can be associated with "(Narrative / Notes)”. If multiple columns are selected, the values will all be added to the Narrative / Notes, with text appearing in the order of the columns.
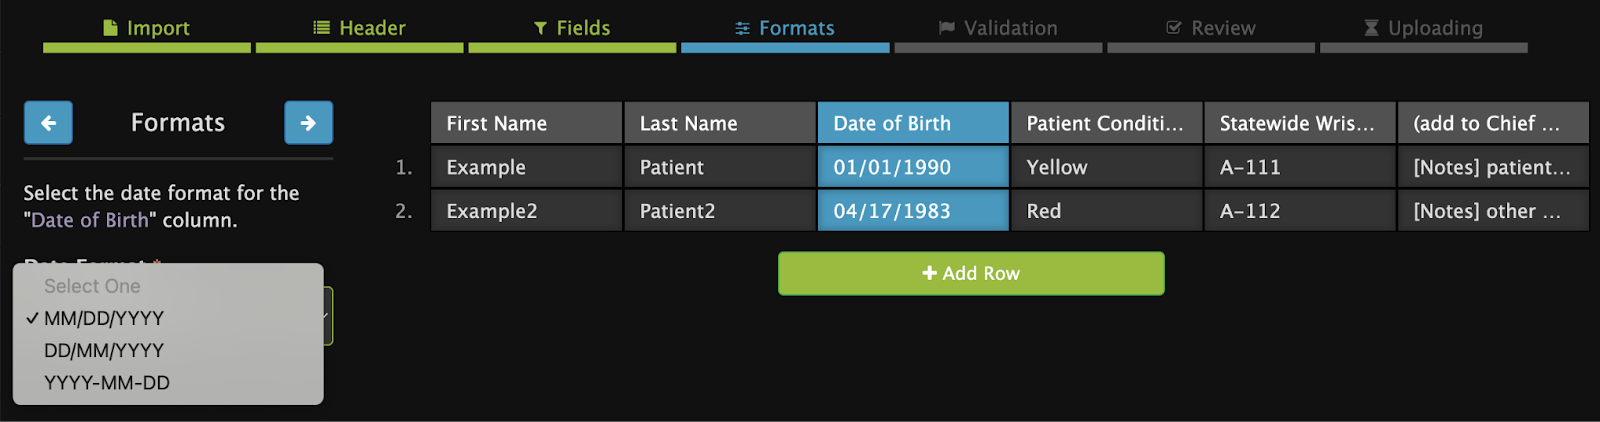
4. Configure Data Formats
Certain Pulsara patient channel properties need data in specific formats that might not match how the data is specified in the import file. For example, Pulsara uses labels like "Green," "Yellow," and "Red," but a CSV file may use labels like "Critical" or "Emergent" instead.
When CSV columns are associated with Pulsara patient channel properties that require specific formatting, the following steps will prompt the user to define the translation between the data in the import file and the standard Pulsara forms.
The system will also prompt the user to define units to use for certain data types, such as whether patient weights are specified in pounds or kilograms and the date format for date of birth.
Use the blue forward button to progress through each column that requires configuration.
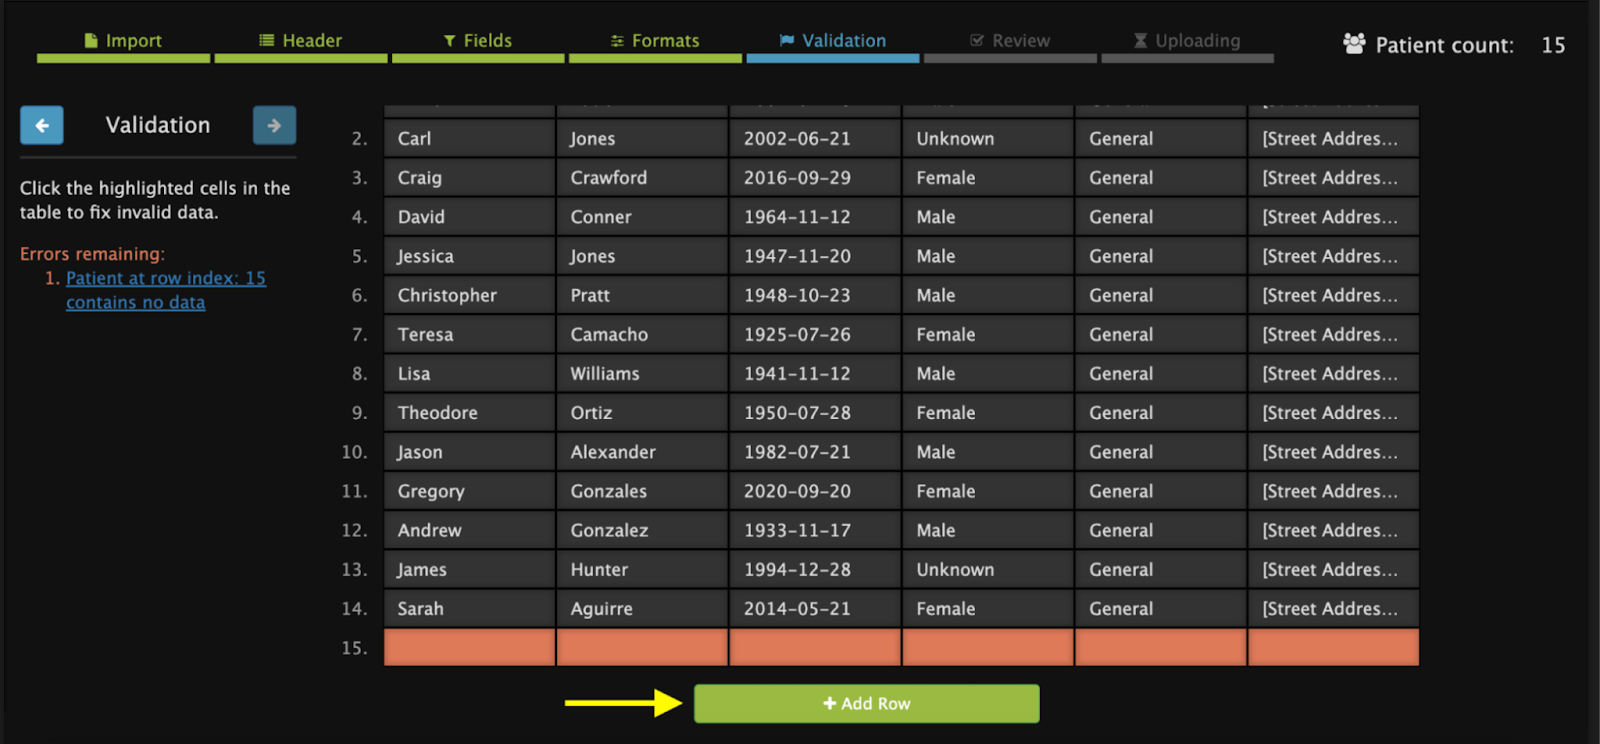
5. Validate Data
After all data formats are defined, the import wizard will validate all the data to be imported against the requirements of the properties being used. The validation step will also attempt to detect duplicate patient records within the CSV file.
If all data is valid, one can proceed to final review and import by clicking the forward button.
Any validation errors detected will be listed in the left panel, and associated cells will be highlighted in red in the preview. Errors can be corrected by either:
- Clicking the highlighted cells and editing the contents
- Mousing over the row and clicking the remove icon to the left to exclude this row from the import
The import cannot be completed until all validation errors are resolved.


Rows not contained within the initial roster upload can be added and filled out by selecting the add row button at the bottom
6. Review and Import Patients
After validation is complete, a final preview of the data to be imported and a brief summary of the import will be shown.
When ready, click the Upload button on the left to import patients.

7. Upload Status
After initiating the roster import, a status screen will display, periodically updating with the progress of the import job.
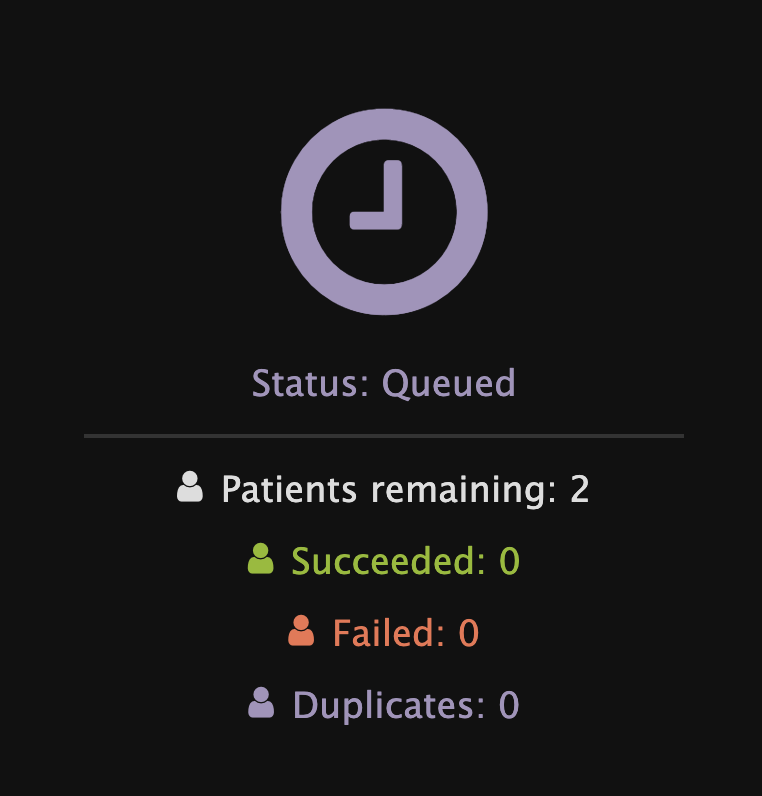
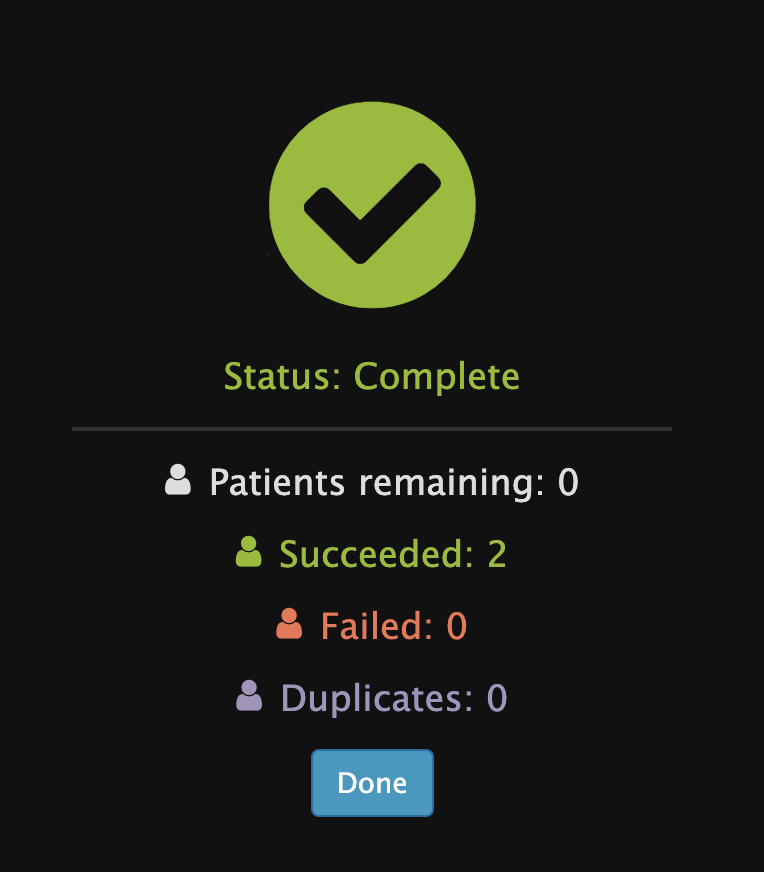
Once the import is complete, clicking the Done button will return to the patient list for the Incident, where the newly imported patients will appear.
Duplicate Patient Prevention
As a patient safety precaution, Pulsara will attempt to avoid importing patients via the Roster Upload feature if the patient data to be imported appears to duplicate existing patient records within the same incident.
The detection of duplicate patients within the CSV file occurs prior to import and must be corrected in the Validation step.
Detection of potential duplication of an existing patient record also happens when the import job is processed. If duplication is detected, the new patient record will not be imported, and the count of duplicates in the CSV file will be displayed on the status screen.
The logic for duplicate checking works as follows:
- If an import row contains any Configurable ID values, it is considered a duplicate if the Configurable ID values all match existing patients.
- If an import row does not contain any Configurable IDs, it is considered a duplicate if there are existing patients with matching demographic information.